Monday, December 17, 2018

Performance Review


Projects

Infographic:

Near the end of the semester, we had to research and design an infographic from scratch. Although I am not yet done with it, I have finished the research and graphics. A challenge I came across was with using Adobe Illustrator to make the graphics. I had very few experience with Illustrator at the time so I didn't know what I was doing. Even after I learned the pen tool, which was vital for the graphics, I still wasn't very good at it. Some feedback I received was that I didn't make very many graphics. Throughout the process, I stuck with the drawing from my sketchbook. I didn't change much. My overall opinion on my graphic design work so far is that I'm definitely improving.
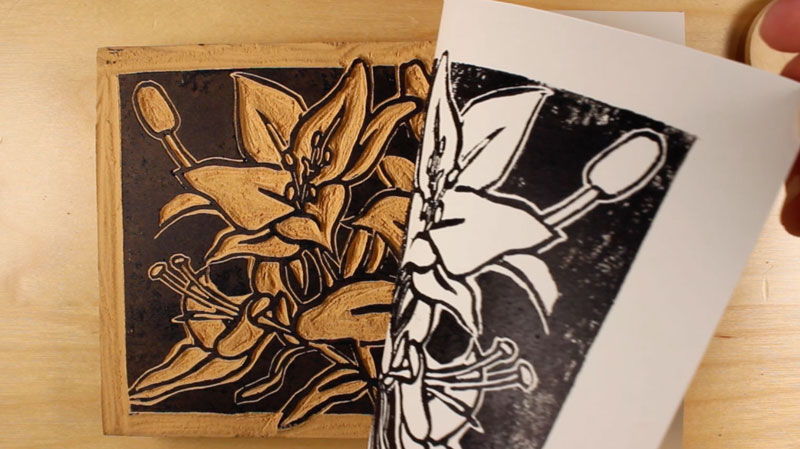
Pop Art:

For this project, I had to photograph a person and add a pop art style to the picture through photoshop. This project took weeks to make. My challenge with this project was time. I'm a bit perfectionist so I spent a lot of time trying to make it perfect. In this project, I learned about Andy Warhol and the pop art style. The only feedback that I received for this project is that it was good.


Panorama 

For this project, I had to combine related pictures into a panorama. I chose to use pictures I took in Missouri. This project took me a week or two to create. My challenge for this project was a lack of creativity. I couldn't think of a fun and creative way to combine my pictures together. I ended up being unoriginal and just putting the pictures side by side. I learned how to create a panorama. I didn't receive feedback and I didn't change much from my original idea.

How I Used My Time

For most of these projects, I used my time well in class. Especially with the pop art project, I did as much as I could in the time I was given. Sometimes, I even came into class during Raven 50 to work. There were some days where I needed to work on homework from other classes but other than that I used my time well. Outside of class, I sometimes practice with photoshop.

Strengths

I'm much better in photoshop than other graphic design software. Within photoshop, I did best when I created my pop art project. Pop art was more fun for me so I put more effort into it, thus making me better at it. I also did good at photoshop challenge #1.

Weaknesses

My biggest weakness was creating my panorama. I'm also not very good at communicating. 

Summary

I loved learning how to use photoshop. Something I would like to change is how I sometimes work on other classes' work during this period. My overall takeaway is that I enjoy graphic design for the most part. In the next year, I would like to further improve my graphic design work.

Sunday, November 18, 2018

Watercolor Transfer Prints


How I Created my Watercolor Transfer Prints

1. First, I went into photoshop and reflected both of my images that I wanted to print and I made one of them black and white. (Making it black and white makes the watercolor more visible.)

2. Then, I printed the images out of the printer.

3. Next, I put watercolor onto watercolor papers.

4. After that, I put mod podge onto the images I printed out.

5. Next, I put the images face down onto the watercolor papers.

6. Finally, after the mod podge dried, I put water on my fingers and rubbed off the paper.

Reflection

I did most of it well although I wish I put more mod podge on the pictures in the beginning. It took me longer than it should have to rub off all the paper but at least the prints turned out alright.


Monday, November 12, 2018

ONW Procedures


What was the concept that our group identified for the assignment?

Our group was required to have an idea for an educational video on how to do something at ONW. The concept my group decided on was how to check out a book. Later on, we also included how to return a book.

What was the process?

After we decided on the video we were going to make, we began storyboarding. On a large piece of paper; we put beginning, middle, and end. In the beginning, we wrote that the student would grab a pass to go to the library. In the middle, the student checks out a book. In the end, a different student returns their book. After we wrote what would happen, we planned the camera shots. That was the storyboarding process. Next, my group recorded the footage which was unfortunately on a day I was gone. Then, each person edited their own video with the footage.

What was my role in the process and what did I learn?

I was the director so my group relied on me to make decisions and communicate our ideas with the teacher during storyboarding. I learned that I do not like being a director.

What would I do differently? Why?

I was kind of an indecisive director so I would've liked to have been more decisive. I also wish I could've been there for filming so I could've helped my group.

What would I do the same? Why?

For the most part, I liked my editing. I think it flows nicely from scene to scene and it gets the message across.

What experiences will I draw from to enhance my next project?

I'm improving in my editing which is something I'll need to do to enhance future projects.


Tuesday, October 16, 2018

Printing Processes


Relief Process

In the Relief process, paper is pressed against ink on top of carved wood to create a 2d image with a 3d look to it.

To begin this process, start by toning the block with an Indian ink wash or a wash of a jet black film ink. Once you're done, the drawing can be transferred onto the wood with the aid of an iron oxide or carbon paper transfer. After that, you can either use a white line or black line composition. White/black line composition gives the art a 3 dimensional look. After an image is carved onto the block of wood, ink is rolled onto the wood and a thin piece of paper is laid on top. Lastly, the image is transferred to the paper by pressing down on the paper with a baren.

Image result for relief printing process example
Example of Relief Process

_____________________________________________________________________________

Intaglio Processes

An Intaglio process is any print making process where the image area is below the flat surface of your printing matrix or plate. There are many different versions of the Intaglio process. Some of these Intaglio processes are dry point and etching.

In the dry point process, you directly move or scratch the material on the plate. When scratching the surface, use etching tools. An example of an etching tool is a steel scribe. What you're doing is moving the metal to raise a burr. The ink will later be held on these burrs, creating a fuzzy line. You then use different tools to add texture to the image. An example of a tool that would create texture is the roulette.

In the etching process, you'll use similar tools to the dry point process. First, polish and clean the plate. Next, you'll apply a ground to the plate to act as an acid resist. Once the ground is applied to the plate, the color of the surface should be jet black. Then, you can draw on the plate by scratching the plate. Instead of raising burrs, it'll be scratching away the ground to reveal copper. The copper lines are what will be printed onto the paper. Next, the plate is etched for 15 minutes, rinsed, then etched again for another 15 minutes. All you have to do now is wipe the plate with ink and press paper onto it at high pressure.

See the source image
Example of Intaglio Process

_____________________________________________________________________________

Lithography Process

In Lithography, an artist will draw using a greasy material on a lithographic stone. Lithography revolves around how grease and water resist each other.

Firstly, create a drawing using a greasy material on the stone. Then, you'll apply chemicals onto the stone such as gum arabic to establish the areas where water will go. Rosin and talc will help when you etch the stone. After that, you can draw over the original drawing with things like lithopencils and lithographic crayons. Then, you'll be ready to etch. Apply gum arabic to the non-image areas, then apply acidified gum arabic, then apply more gum arabic. Use a cheesecloth to buff the gum arabic in nice and evenly. Then, wash the stone with lithotine. It will look like your drawing disappeared but it's still there. Next, buff the asphaltum onto the stone. Now, you're done etching the stone. Wetten, dry, sponge, then ink the stone. Then, you force ink into the stone. After 4 to 6 news prints, you'll finally get the full image onto a piece of paper. 

See the source image
Example of Lithography Process

Sunday, September 16, 2018

Photoshop Challenge 1


Displaying photoshop challenge.jpg

Final Image

When I was given the original image of the man, my idea was to make the portrait dark and creepy. I thought a dark forest for the background would fit that idea. The original idea was expanded upon after I began working in Photoshop. When I first started working in Photoshop, the first thing I did was make a mask to remove the original background. Then I set the background to a dark forest from unsplash.com. Next, I used a second mask to put a forest onto the jacket. Then, I duplicated the man and used blending options create an effect where the man looks more pale and his hair, eyes, mouth, shadows, etc. were darker. After that, I used adjustment layers and blending modes to darken the image and change the contrast a bit. The end result looked better than I expected and fit my vision pretty well.

Thursday, September 6, 2018

Photoshop Lessons


Content Aware Fill


Clone Stamp and Healing Brush


Spot Healing Brush


Patch Tool


Building a Portrait Collage

Reflection

The assignment I was tasked with was to watch a series of tutorials and replicate what the guy does in the video in Photoshop. The process of creating the Photoshop images started with watching the tutorial on how to use the content aware fill feature. Then, I used content aware fill on 4 images. I had to get rid of random things in the background for 2 of them. For the surfboard images, for one of them I had to get rid of the logo and for the second one, I had to move the logo higher on the surfboard.

Then, I had to use clone stamp and the healing brush to remove a tag from clothes. In another image, I had to remove a pole from the background. The clone stamp duplicates parts of an image and blends it in somewhere else. The healing tool can help match the textures of an area with the texture of somewhere else. Next, I used the spot healing brush to remove the blemishes from a kid's face. I also blurred areas that the spot healing brush didn't work on. The spot healing brush is a very simple version of the healing brush. Lastly, I learned the patch tool. It's a very useful tool for blending. In the tutorial, I had to remove a graphic off of a T-Shirt to make it look like a plain blue T-Shirt.

For the last tutorial, I was required to use all the tools I had learned along with some other new tricks to build a portrait collage. I had to remove tree branches from the background and replace it with sky, which was easy because luckily the background was blurred. I had to use content aware scale to stretch out the background to the middle image. For the middle image, I had to use a mask to remove the background and clean up some areas.

For me, the first 5 tutorials were quite straight-forward and easy. The portrait collage caused me to struggle a lot, but I learned a lot in the process. The only tool I already knew how to use from the tutorials was the clone stamp tool, so I learned how to use a lot more tools to my advantage. I also learned how to use masks properly, which is something I didn't even know how to use beforehand. I can apply all the knowledge I've learned to future projects to make my graphics more convincing and pleasing to look at.

Monday, August 27, 2018

My Self-Portrait


In my self-portrait, I represented myself by recording my room, making jokes, and telling a bit about myself. What I wanted to show others was that I have a passion for video production and graphic design, and that I'll probably branch off into video production for entertainment purposes. I wanted to show this because I believe my dry humor and the things in my video show parts of who I am as a person. My tripod showed my passion for e-comm, my controller showed one of my hobbies, and my jokes showed some personality. When we viewed examples of portraits in class, the one that inspired me the most was Jeremiah's because he showed off things that represent him, similar to mine.

I used close camera angles because it focused more on the specific items that I recorded in my room. In my self-portrait I included academic awards because I put effort into school. I also included a life savings jar that may or may not have only had a couple coins in it because I thought it’d be funny. The objects in my room that I used connect back to what I wanted to show about myself because I’m just a guy in e-comm that plays games and has no life.

Some of the elements of my self-portrait include visuals and humor. Some of the humor was even shown through visuals. The visuals of my video mainly focused on items in my room that represent who I am. For the humor. It was mostly just visual gags like the whiteboard or the “life savings” jar.

Ultimately, what I hope viewers gain by looking at my work is that I enjoy video production and I like to include humor within the video. I think I was successful in achieving this because a good amount of people were laughing at the video. Next time I create a self-portrait, I will speak a bit louder because it’s kinda hard to hear me in the video.

A challenge I faced in creating my self-portrait was making it long enough because I kept making it too short. I overcame this challenge by adding more things to show in the video and spending more time on individual things in the video. Overall, what I learned from the process of creating my self-portrait is that I have no idea how to do the rule of thirds and I also need to speak up a bit.

Tuesday, May 22, 2018

4th Quarter Reflection


4th Quarter Reflection


Product and Presentation

The 4th quarter project that was assigned to all students of the eComm program was to create a fake company and make a website and presentation for our company. On the website, we had to include a video advertisement and a 3d model of our product. The project was supposed to take a quarter to finish, and my group used the whole quarter to work. Our biggest challenge this quarter was when we had to make the website, because nobody in our group wanted to make the website and none of us were very good with Dreamweaver. I ended up making the majority of the website but my group still helped me when I needed it. We had to work on the website during Raven50 every day for a week because that was our biggest challenge. During this quarter, the best improvement I made was getting better at Dreamweaver. The only constructive criticism I received this quarter was that I should let my group know when I'm going to be gone in advance. Something that's changed about me this quarter is that I've gotten better at working in a team. My overall opinion of this project is that it wasn't fun, but it was a good learning experience that also improved how I work with a team.

Time Management

I finished everything during class time except for the website which I worked on during Raven50 as well as class time. Whenever I finished something, I didn't do anything productive for the team, although I should have worked on the website. However, I did tell my team when I was done with something. Outside of class, I finished the website using Dreamweaver. At home, I have practiced video editing and photoshop but it wasn't for anything school-related. 

Strengths

During the past school year, my biggest strength has been video production, because it's my biggest passion out everything in eComm. I'm the most motivated to create videos, so I've been trying my best to improve in that area. I do it in my free time, unlike some of the other categories in eComm.

Weaknesses

The part of eComm that I'm worst with is animation, because it's something I don't do outside of school, and I don't plan on taking an animation class. I'm still not very good with website design either but I've done enough with Dreamweaver this quarter to say I'm at least half decent at it. 

Summary

The part I loved most about this quarter was when we first started the project, when we were brainstorming ideas for our company and sketching logos. Something I really wish I had done differently this quarter is that I should have started the website earlier, because we ended up rushing. My overall takeaway of this quarter is that I somewhat know how to make a website now and I've also improved at working in a team. My goal for next year is to improve more in video production because at the start of the year, the only Adobe application I knew how to use was Adobe Photoshop. I didn't know anything about Adobe Premiere so I've been learning the application. My final thought is that I want to continue to improve my skills even more next year.

Work Samples


Coupon

Advertisements


Logos

Banner


3d Model

Website

Home Page


Locations


About Us


Coupon Page


Friday, March 9, 2018

CSS and CARP Design


CSS and CARP Design


Introduction

When I first started this project, I had a blank website. I started off with the text and an image of a dog. I aligned the headings toward the center and I changed it's color to brown. Then, I made an almost white/tan colored box to put my poem and title inside of. I changed some of the fonts to either Georgia or Impact. I also had a black border around the whole thing, with the dog image to the right. There's also a link at the top to my other website page.

CARP

This project represents CARP because there's a lot of color contrast. There’s tan, brown, dark brown, and black, and they go together very well. There’s also contrast with the fonts. The text that is meant to stand out is Impact and the text that shouldn’t stand out but is still noticeable, is in the Georgia font. The alignment of my website is that the headings and tan rectangle are in the middle of the website and all the text is along the left-side of that rectangle. For repetition, the same fonts are used multiple times throughout the website. Some of the same colors are used multiple times as well. The proximity for my website is also well done. The poem is grouped together in paragraphs. The headings are grouped in the middle of the top of the tan box.

What I Learned

During the process of creating this website, I re-learned how to do a lot of web design things that I had forgotten from last quarter. I remembered how to change font, color, size, etc. I was able to edit the text in any way I imagined. I could also move around the text and images to different areas on the page. I already knew plenty about CARP, but this project reinforced what I already knew.

Tuesday, February 27, 2018

My Personality Type


My Personality Type


My Personality

My Myers-Briggs personality type is INFJ. It is the least common personality type in the population. People with INFJ personalities are sincere and sympathetic but they keep to themselves. They are most likely to stay in college and get a high GPA. Many people with the INFJ personality type are religious, and like to be counselors, teachers, or artists. Some famous people with this personality type are Gandhi, Eleanor Roosevelt, and Thomas Jefferson.

Is is Accurate?

I feel like the INFJ personality type describes me pretty well. I am sympathetic, reserved, and easygoing. On the other hand, I don't want to be any of the career choices listed above. 

Misunderstandings

It is very common for people to assume that introverts are shy or they hate people. Some of my friends and family have thought that I'm shy, when in reality I'm not. I used to be shy, which is the cause of the misunderstandings I still get.

Did I Learn About Myself?

A lot of the facts about INFJs, I already knew about myself. I know that I'm introverted and reserved. I know that I'm sympathetic and easygoing. I didn't know that I'll do good in college, and I also didn't know that I'm the rarest personality type.


Monday, February 26, 2018

Sketchup House


Sketchup House


Wall Texture

Roof Texture

Scope

When I first started my Sketchup project, the scope of my project was to find a house on houseplans.com that met the requirements. The house had to be big enough and the roof couldn't be flat. I personally didn't want to create too detailed of a house, but it couldn't be too simple either. I finally chose this house: Here

Process

The pre-production process of the Sketchup House was the process of deciding which house I wanted to create. After I opened Google Sketchup, I started off by creating the walls of the House, keeping in mind the measurements displayed on houseplans.com while doing so. Next, I had to make a better roof by putting a line down the center of the roof and pulling it upwards. Next, I created the porch and stairs, which wasn't difficult. The part I struggled with, the most was the windows. Creating the windows took me a couple days because I spent a day creating the window panes and the other day trying to duplicate them across the house. When I made the door, it wasn't that bad, but I did have to create a window on the door. After that, I looked for textures. I needed a blue texture with stripes for the walls and a roof texture. Then, I was finished.


What I Learned

This project taught me how to create a house using Google Sketchup. I gained experience with Google Sketchup and I know more about how to design a house. I also realized that this isn't a field I want to work in.